Ordering your cube off-the-shelf.
A fully assembled version is also available. Please note that cases are not available at the moment. We are still researching for a socket case, to make your cube look even more perfect.
Constructing your VisualCube.
Constructing a cube is simpler than it may seem first. Your kit consists of 3 components:
- The board and a USB connection cable.
The board comes pre-assembled with all electronic parts, except the LEDs, the wires connecting the LEDs and an optional case for hiding the interiours of the board are missing.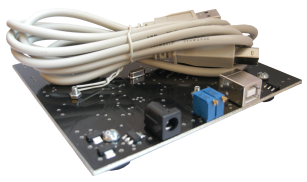
- A set of 6x6x6+6 LEDs and wire.
These parts have to be assembled manually by you.
- A case.
Please note that an official case is only available for the ready-mounted cube. However, a case is not functionally necessary since each shipped board is equipped with four rubber feet.
The board comes pre-assembled with all electronic parts, except the LEDs, the wires connecting the LEDs and an optional case for hiding the interiours of the board are missing.
These parts have to be assembled manually by you.
Please note that an official case is only available for the ready-mounted cube. However, a case is not functionally necessary since each shipped board is equipped with four rubber feet.
Tools you need for assembly:
- A soldering iron.
Preferably long, with a medium-sized tip.
- Soldering tin.
A fairly amount of solder.
- A pair of pliers.
For cutting, holding and straightening the wire.
- A mold.
It is optional, but may increase the quality of your results: A mold made out of wood, with equi-distant holes, helps keeping the same distance between the LEDs.
Preferably long, with a medium-sized tip.
A fairly amount of solder.
For cutting, holding and straightening the wire.
It is optional, but may increase the quality of your results: A mold made out of wood, with equi-distant holes, helps keeping the same distance between the LEDs.
What now follows is a document containing a step-by-step guide how to assemble the cube in the most effective way. It describes more or less the same steps we would do for you. It further contains a data sheet, installation and programming instructions in case you are curious.

Press this button to start downloading
visualcube-manual-2color-v3.2.pdf


